
In this part we are going to be looking at how to draw triangles and other primitives to the screen using what is called "Immediate Mode". This is the easiest way to get things on the screen but is also the slowest.
If you have not yet followed part 0 or don't know how to set up a C# project with OpenTK as a reference make sure you follow that part first. We will be starting from there.
Step 1: Creating Our Own Game Class
Before we are start drawing things to the screen we need to make our own game class that will latch on to the events in our GameWindow so that we can load, update, and draw things to the window. In order to do this simply right click on your project and select Add -> Class...
In the dialog window make sure you have "Visual C# Items" selected and "Class" selected in the main window. Name the class "Game" (Or whatever name you would prefer) and then click OK.
This is how we are going to be making all of our classes in the future and will not be covered again.
Visual Studios will then go ahead and create the class (with a few using statements and inside our project's namespace) for you and add it to the project. It should look something like below. (Notice the Game.cs is listed under our project)
Just below the default using statements we need to add a few of our own so that we don't have to type them every time we want to use a class from them.
Once those are added we need to make a constructor for our Game class. So inside the curly brackets for our class add a constructor that simply needs a GameWindow variable as an argument.
This window variable will serve as a handle for us to access the GameWindow created in Program.cs but it will go out of scope as soon as the function ends. We are going to need to access it later on in order to swap buffers and get info about it's state so we need to create a variable in our Game class to store a reference to it. We will name this variable "window" as well and set it's value to the value of the passed in window.
With that done our next order of business is to add event handlers onto the GameWindow's Load, Update, and RenderFrame events. Visual studios has a nice shortcut to do this by typing "NameOfEvent += " and then hitting [Tab] twice in a row it will automatically name and add a function to our class as well as the correct arguments for it to serve as an event handler for this type of event. Do this now for the window.Load, window.UpdateFrame, and window.RenderFrame events and you should end up with something like the following.
Go ahead and get rid of the NotImplementedExceptions in all three functions.
Head back over to the Program.cs. Between the creation of our GameWindow and the call to it's Run function we need to create the instance of our Game class. We'll name this variable game and pass it our window variable that we just initialized.
With that, our game should now be tied to the window and can function solely off event handling. That should be everything we need to do for now in the Program.cs so go ahead and save and close that.
Back in our Game.cs we want to add a few lines to the window_RenderFrame function so that we can make sure everything is working correctly.
GL.ClearColor is a function that sets the default color to place when clearing the ColorBufferBit from the screen. After we've set what color we want it to clear to we tell it to actually clear the screen by calling GL.Clear and specifying the ColorBufferBit. Finally window.SwapBuffers tells the window to swap the currently displayed buffer with the one we were just drawing to.
This is our first real taste of the OpenGL side of OpenTK and there's a few things we can learn from it. First of all the GL.ClearColor function is one of many functions that simply sets a variable that will be used later. The OpenTK GL interface has hundreds of functions like this and it's important to know which ones you need in order to accomplish a task. For example if you were to simply call Gl.Clear before setting the clear color it would simply clear the screen to black. However if you wanted to clear to a different color, there's no way to specify the color to clear to inside the Gl.Clear function. This happens a lot in OpenGL and can be frustrating to beginners and experienced individuals alike. The only thing I can suggest is to read the documentation about each function and find the related functions that correspond to it. You can also often read the documentation about OpenGL (rather than OpenTK) and it's usually pretty easy to transpose things into C#. For example on the OpenGL documentation page under the function glClear you will find glClearColor in the "See Also" section.
Another thing I want to mention is related to window.SwapBuffers. If you have not heard of buffers before this might be confusing to you. I will do a quick run down of what is happening but there are also lots of explanations out there that I recommend looking up if you are still confused. Basically there are 2 (or more) buffers that OpenGL stores. Think of these buffers like images. Now when we call GL.Clear, or later GL.Vertex2 or any other drawing function, the buffer that is drawn to is not the one that is currently being presented on the screen. The images are actually being applied to a buffer in memory. The reasons for this are many but regardless if we never swapped the display buffer and the one we are drawing to then nothing would happen to the displayed buffer and you would only see the original white screen. However, once we call SwapBuffers the current display buffer is swapped with the bound buffer (the one we are drawing to) and that's when everything we just drew is displayed on the screen.
Anyways, with those few lines added you should now be able to run the program and see something like the following.
Step 2: Drawing a Triangle
Now that we have our Game class ready to go we can start getting into some actual OpenGL functionality. In this part I said we were going to be using "Immediate" mode to draw things. Drawing things in immediate mode is very simple and at it's core is about 3 functions: GL.Begin, GL.End, and GL.Vertex2 (or GL.Vertex3). Essentially all we need to do is tell OpenGL that we are going to start drawing, along with what type of primitives we will be drawing. We then proceed to tell OpenGL all our vertices positions in order. Once we are done we simply tell OpenGL and it will take all the vertices passed to it, group them together into the appropriate primitives, and display them on the bound buffer.
Using this knowledge we can write these few lines of code into our window_RenderFrame function.
This will draw a triangle with vertices (0, 0) (1, 0) and (0, 1). If you run this code now you should see the following.
Note that the BeginMode overload of Gl.Begin is obsolete and should be replaced with the PrimitiveType overload as shown here. Both will work but only because of backwards compatibility.
Voilà! Our first triangle. Now this isn't a very sightly triangle I must admit but there is a certain amount of beauty to being able to do all this in only about 20 lines of actual code.
There are many other primitive types besides triangles and I encourage you to give them a try and see how they work. You can also find information about each one in the documentation. In this tutorial we will mainly focus on Triangles and Quads as they are the easiest to understand.
Step 3: Color and Alpha Blending
Now if you want to change the color of this triangle all we need to do is set the draw color before calling Gl.Vertex2. We can do this by calling GL.Color3 or GL.Color4. Both will work identically at the moment since we have not enabled alpha blending yet. Let's try something like the following.
In this example we set the color at the beginning and then draw all 3 vertices. It's important to note that the draw color will not reset after each Vertex2 call and will persist through all the vertices of our triangle. This can be unexpected sometimes but is a common occurrence in OpenTK.
Note that the Color, TexCoord, and many other variables will persist even past the end of each RenderFrame function call. If you don't set the color before calling Vertex2 then it will simply use the last color that was set, whether it be from 2 lines earlier or 100.
As a result you should get a triangle like this.
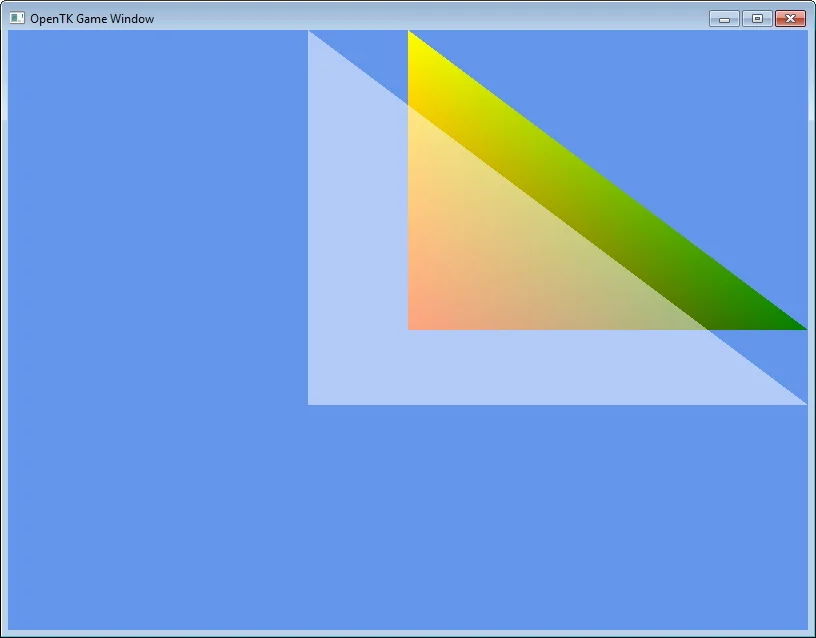
We can also change the color in between each vertex and get a multicolored triangle.
Now what if we want a slightly transparent triangle to be drawn on top of this one? You might think we could simple call Gl.Color4 with a color that has half alpha but if you try that right now you would see that it would still be 100% opaque. The reason for this is that the default state for OpenGL is to have transparency disabled. We need to first enable transparency and define how things will blend before we draw our transparent triangle. In order to do that we simply need to add these two lines to our window_Load function.
GL.Enable is going to be a common function used when dealing with OpenGL. It will allow you to turn on and off many different sections of functionality in OpenGL. Understanding the BlendFunc function isn't all that important since most of the time this is the setup you are going to want for regular alpha blending. Essentially this is just defining what function OpenGL should use when combining a less than 100% alpha color on top of another.
Now back in our RenderFrame function let's go ahead and draw another partially transparent triangle after the first.
Note that the int overload for Color3 and Color4 expects values from between 0 and 2,147,483,647 (int.MaxValue) so don't be surprised if GL.Color4(255, 255, 255, 255); comes out black and invisible.
If we go ahead and run this you should see the desired effect.
Step 4: Depth Testing
Now up to this point the triangles are automatically laid one on top of another depending on which order you pass them to OpenGL but often times we would like to define which order they are in manually. This is just a nice plus when working in 2D but is almost essential when working on 3D projects. This is where the Depth Buffer comes into play. The depth buffer is similar to the color buffer that we have been drawing to in some ways but instead of being a 2 dimensional array of colored pixels that are shown on the screen it's a 2 dimensional arrays of values that define how far away from the front of the camera each pixel is. When each new pixel is about to be drawn OpenGL does a test with the current value at that location on the depth buffer and decides whether the new color should be placed "on top". We will be defining how this test works ourselves and in which scenarios it should be true.
However before we get to asking OpenGL to run these tests we need to first tell our GameWindow that it's buffers should contain a Depth Buffer. This happens in the initialize function of the GameWindow which, if you remember, was back in our Program.cs. So go head back over there and lets add an argument to the new GameWindow() call.
There are more overloads of the GameWindow constructor that you can call as well but for now all we need to mess with is the GraphicsMode, which up until now was initialized to the default state of 32 bit color and 0 everything else. Now the 4 numbers inside the GraphicsMode initializer define how many bits each buffer type should contain. For example we want 32 bit color so the first number is 32. The second number defines how many bits for the depth buffer. In this case we will be using 8 as we don't need a TON of precision at the moment and every bit that we add creates a whole lot more work on the GPU and CPU. And then the last two numbers are for stenciling and anti-aliasing. We don't really need either at the moment, though if you want to get rid of the jagged edges of our triangles you can enable anti-aliasing.
Now that we have the depth buffer being created we can head back over to our Game.cs and tell OpenGL to enable depth testing.
Again we call GL.Enable to enable the DepthTest functionality and then we call DepthFunc to define our function for testing whether one value "lies in front of" another value. In this case we are going to be defining a value of 1 in our buffer to be the very "back"and a value of 0 to be the very "front". So when the new depth value is compared to the existing depth value we only want the new one to be applied if it has a less than or equal ("Lequal") value than the existing one.
Now if we head back on down to our RenderFrame function we now need to make sure that the DepthBuffer gets cleared just like the ColorBuffer does. We can clear both bits in the same GL.Clear call if we simply bit-wise or the two enum values together.
Bitwise combining of the two enum variables is possible because the actual integer values of each value in the ClearBufferMask enum is a multiple of 2 so if you were to look at the bits they would be something like 00000001, 00000010, 00000100, ect... each value occupies a unique bit. Doing a bit-wise or will result in two bits being on and the function will then do the appropriate clearing operation dependent on each bit.
Also note that GL.ClearDepth is not required in this situation since the default value is already 1 but it's important to know that it can be changed and will affect what the value of each pixel in the DepthBuffer will be cleared to.
Now that we've cleared to depth buffer let's make sure we are defining a depth for each vertex that we draw. We can do this by changing our Vertex2 calls into Vertex3 ones and entering our depth value into the z input.
With this configuration we should see the colored triangle being drawn on top of the white transparent one even though it was drawn first.
Seems like everything is ship shape! However, this method of depth testing isn't perfect and doesn't always work like you might initial expect when it comes to alpha blending. For example if we have the transparent triangle drawn first but with a depth value that presents it in front our our colored triangle you're going to get something like this.
What happened to our transparency??
It's actually still there (the white triangle is still a bit blue). The problem is when the GPU goes to draw the second triangle it does the depth testing and determines that it does not need to draw any of the pixels that land on the first triangle because the new depth is greater than the existing one.
This is a nice insight to how the depth testing is actually working and should be kept in mind if you are planning on having semi-transparent objects in your game. If they are not drawn in the correct order then you may get culling of things you had not planned on.
That's the end of this part. In the next part we are going to go into how to load a texture from a file and display on a triangle or quad as well as looking at using matrices for transformation of our primitives.